DIY Cake Flour, Self-Rising Flour, Seasoned Flour, and MORE!!!

Ever browse online for recipes and find one that looks awesome but you don’t have the correct flour in your pantry?

What, you expect me to run out to the store and buy a whole bag of this special flour for this one little recipe? No sir!

If I had a dollar for every time I thought, “Well, that’s out! Next!” when looking at recipes simply because all I had in my cupboard was your standard All-Purpose flour, I’d be rich. Then of course there are the days where you’re in no hurry to bake so you drive yourself all the way to the grocery store, get the flour you need, then drive all the way back home only to use that flour once. What a waste of time, money and energy!

I’ve found that one of the best things you can do as a baker (or as someone who likes to cook in general) is to familiarize yourself with all of the different types of flours and understand what makes them different from each other so you can recreate them in your own kitchen.

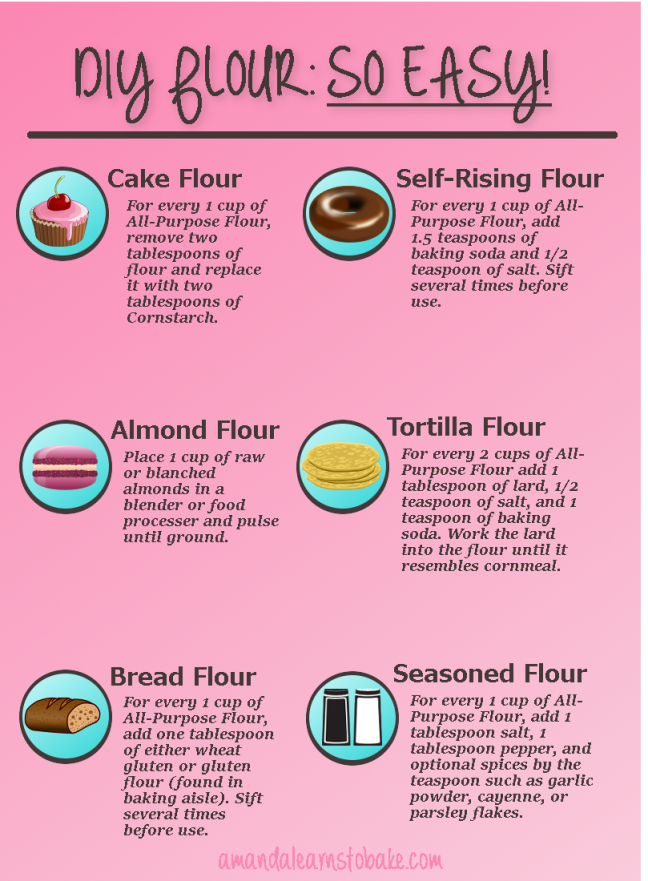
I’ve created this handy guide that I hope you can use to your advantage! You can thank me later. 🙂

flour infographic

Cake Decorating: Upside Down Method for Straight Edges

Hello, friends! This post is going to be all about how to use the upside-down icing method to get a crisp top edge on your cake. I made this particular cake for Easter, and although I’m not totally proud of my smoothing ability, it definitely does have some sharp edges. It is extremely easy to do, so I want to hurry up and get this mini tutorial out here for you so you can use it on your future cakes!

I plan to make some tutorials on how I did the calla lilies and tulips very soon, probably sometime this week–so definitely keep an eye out for those posts! You can follow me to be notified of when I post them.

I don’t know about you, but the top edge of my cakes has always been the hugest pain in the behind for me. It either looks lumpy, or I go too far scraping it and the cake is exposed, forcing me to ice it all over again and re-scrape. I’m never happy with it.

If you’re looking for a nice, crisp, and smooth edge to the top of your cake then look no further, because this is the best method I’ve found so far. It only adds a few more minutes to your decorating time but the end result is so worth it.

Step 1: Take a piece of cardboard and wrap it in a sheet of parchment paper, securing it with tape or a stapler. Plop a big blob of buttercream on there and smooth it out until it is about 1/4 of an inch thick. Put your first cake layer down on top of the buttercream. In the end, this will be the TOP of our cake.

DSCN0271

Step 2:  Ignore my mess! Okay, really: Build up your cake layers like normal, and if you add any dowels for stability make sure stop before you reach that bottom layer of buttercream. Scrape around the perimeter of the cake, removing excess buttercream. Freeze this baby for like 15 minutes to set the icing!

Step 3: And of course I did not take a picture of this, but ice your cake per usual–including the “top” that will really end up being the bottom. Place your cake board on top of your cake and put it back into the freezer for another 10-15 minutes.


Step 4: Take your cake out of the freezer and, using a knife, cut the parchment paper around the cake. When you flip it over the cardboard should come right off, but a patch of parchment will remain. Peel it off and you’re good to go!DSCN0295

Not going to pretend that this is the best buttercream smoothing I’ve ever done, but my edge sure looks crisp! Pretty soon I will  be sharing a double drip tutorial that will help you take this technique to the next level. Drip, you say? You’ll see!

Stay tuned for future posts on how to achieve this springtime cake!

New Baker Hacks: Add Height to Your Cake Pans

This will probably be the first of many short posts where I provide quick information about something that I have learned in my baking adventures.

In this case–let’s talk baking tins.

As a somewhat new baker I know that I’ve been completely overwhelmed with all of the stuff we are supposed to have, with the most basic being cake tins in 5-inch, 6-inch, 7-inch, all the up to 12-inches or more! Not only that, but some recipes require that you have two, three, or even four of these pans, or that they are 2, 3, or even 4 inches deep. Despite my alternating between typing out the numbers or spelling them out, you get the point: Most of us are lucky to have one pan in one size and depth.

I usually make 6-inch or 8-inch cakes. Any idea how many pans I have?

I have 1 (yes, one) six-inch tin. This means that when I make my layer cakes I have to bake one cake at a time depending on how many cakes I’ll need. Meanwhile my batter just sits there, deflating–a huge baking nono.

I have 2 (yes, two) 8-inch tins, but they are different brands from each other (one is thicker) which means that even though I can bake two cakes at the same time, they won’t finish at the same time. Since some cakes have a tendency to deflate if you open the oven too early, retrieving the cake that finishes first is not always an option.

Anyone who is looking to bake on any regular sort of basis, needs more that one or two pans–including me!

If I had a dollar for every time I ignored a recipe because I didn’t have the right pans, perhaps I could afford the right pans. Ha

I have definitely learned some tricks on how to get around my pan issues (For example, did you know you can get two or three  6-inch cakes out of one 9-inch cake recipe?), but right now I want to focus on how to make your cake pans taller. Does the recipe call for pans that are 4-inches deep but yours are only 2 inches deep? Don’t fret! Fix it easily using aluminum foil or parchment paper! I will show you the parchment.

Step 1: Line the bottom and sides with parchment paper, leaving an inch or two of parchment paper overhanging off the top.

DSCN0360

Step 2: Admire the added height to your pan that you just created.

DSCN0361

Step 3: Fill that baby with even more batter than usual:

DSCN0362

Step 4: Admire your taller cake!

DSCN0377

So, there you have it! No more running out to waste money on taller pans and/or ignoring recipes because your pan is too short. You use parchment paper for all of the cakes you make anyway, so just snip it a little taller next time!

Do you know any baking hacks that are useful for new bakers? If so, add them to the comments and perhaps I can create a post for you and give you credit!